The most reliable way to sterilize wild bird seed at home is dry heat in your oven: spread the seed in a single layer on a baking sheet and bake at 250°F (121°C) for 30 minutes. That temperature is low enough to avoid scorching the seed, high enough to kill mold spores, insect eggs, and most surface pathogens. For bugs alone, freezing at 0°F for at least 4 days is a solid alternative. Neither method is complicated, but the drying and storage steps afterward matter just as much as the sterilization itself.
How to Sterilize Bird Seed: Safe Steps for Clean Seed

Maya Collins
3 May 2026
Why you'd want to sterilize bird seed in the first place
Most fresh, commercially packaged bird seed is fine as-is. But bird seed picks up problems fast once it gets wet, sits outdoors in heat and humidity, or spends months in storage. There are three main hazards worth knowing about.
Mold and Aspergillus
Aspergillus is an environmental mold that thrives on damp grain. When birds eat seed contaminated with Aspergillus spores, the spores can cause aspergillosis, a respiratory disease that hits birds hard. Some Aspergillus strains also produce aflatoxins, which are toxic compounds that can accumulate in the body even at low exposure levels. Cornell's Wildlife Health Center flags both of these as real risks with moldy grain. If your seed is visibly moldy, clumped, or smells musty, don't put it in a feeder. Sterilize it or throw it out.
Salmonella and bacterial contamination
Salmonella spreads among wild birds through contaminated droppings, and feeders concentrate birds in one spot, which makes transmission easy. The Pennsylvania Game Commission notes that salmonellosis in birds can range from rapid fatal illness to a chronic carrier state where infected birds show no symptoms but keep spreading the bacteria. Seed that has been sitting under a feeder, in a wet tray, or near bird droppings is the most common contamination source.
Insect infestations
Pantry moths (including Indianmeal moths) and bird seed weevils are the two most common pest problems with stored seed. Cornell's IPM program notes that bird seed is one of the most common sources of pantry moth infestations indoors. What makes these pests stubborn is that all life stages, including eggs, larvae, pupae, and adults, can be present at the same time. Weevil larvae develop inside the seed kernel itself, so a quick glance at the bag won't tell you whether eggs are present. Heat and cold are the two practical home treatments that can penetrate and kill these stages.
Best home sterilization methods: what works and what doesn't
You have two genuinely useful options at home: dry heat and freezing. Boiling sounds logical but creates a moisture problem that makes things worse. Here's how they compare.
| Method | Target | Temperature / Time | Best for | Drawback |
|---|---|---|---|---|
| Dry oven heat | Mold spores, bacteria, insect eggs/larvae | 250°F for 30 min | Full sterilization before indoor storage | Removes seed viability (won't sprout) |
| Freezing at 0°F | Insect eggs, larvae, adults | 0°F for 4+ days | Bug kill when you want to preserve germination | Does not reliably kill mold spores or bacteria |
| Boiling / steam | Bacteria (some) | 212°F | Not recommended | Saturates seed with moisture, invites mold |
Dry heat is the most complete option. Industrial dry-heat sterilization typically targets 170°C (340°F) for 60 minutes to destroy hardy spore populations, but those are medical-grade standards. For bird seed, 250°F for 30 minutes gives you meaningful pathogen and pest reduction without burning the seed or making your kitchen smell like a bonfire. If your main concern is just killing bugs before storing a new bag indoors, freezing at 0°F for four or more days is a practical, no-fuss method and won't compromise the nutritional value of the seed.
One myth worth clearing up: microwaving seed is not reliable sterilization. Microwaves heat unevenly and won't consistently reach the interior of seeds where weevil eggs hide. Skip it.
Step-by-step: how to sort, clean, and sterilize bird seed without ruining it
Step 1: Sort and inspect the seed first
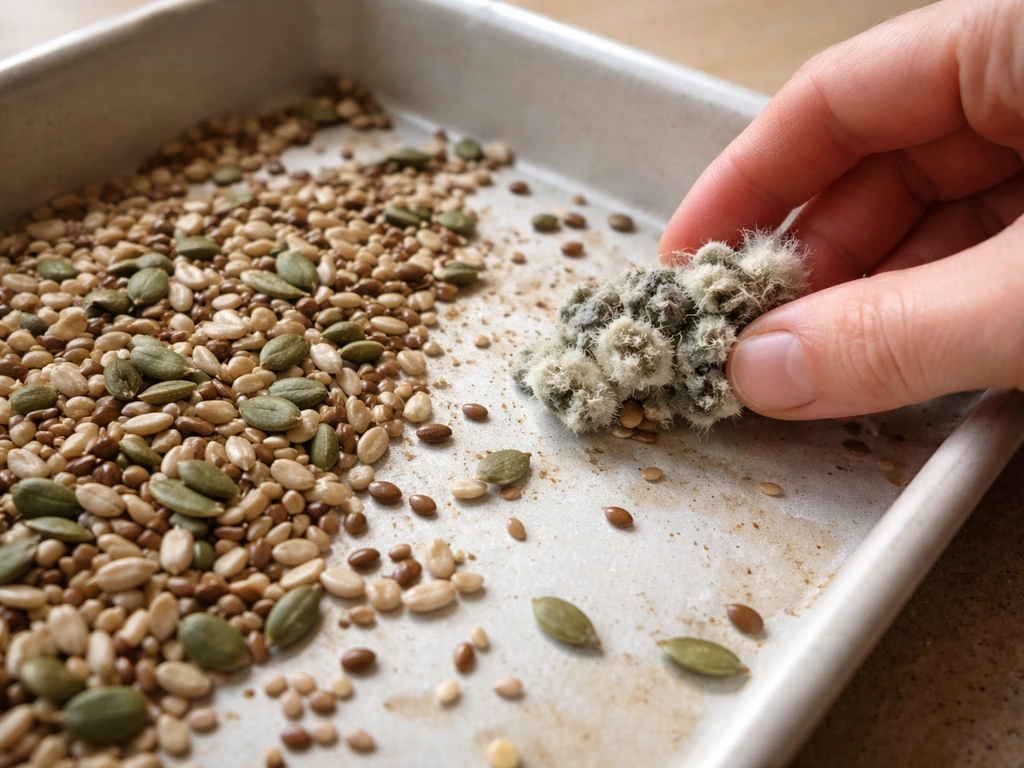
Pour the seed onto a light-colored tray or sheet pan in good light. Remove any visibly moldy clumps (they'll look gray, green, or white and fuzzy), seed that smells sour or musty, obviously cracked or shriveled kernels, and any webbing or small larvae (signs of moth infestation). If more than 20 to 25 percent of the seed looks contaminated, it's faster and safer to discard the whole batch and start fresh. Sterilization helps with surface contamination and kills pests, but it won't undo deep mold damage or remove mycotoxins already produced in the grain.
Step 2: Clean your equipment
Wash your baking sheets, trays, and any storage containers before use. A quick wash with hot soapy water, followed by a rinse, is the minimum. If the equipment previously held infested or moldy seed, soak it for 10 minutes in a 9:1 water-to-bleach solution (nine parts water, one part regular household bleach at 5 to 9 percent sodium hypochlorite), then rinse thoroughly and let it air dry completely before the seed touches it.
Step 3: Sterilize with dry heat (oven method)
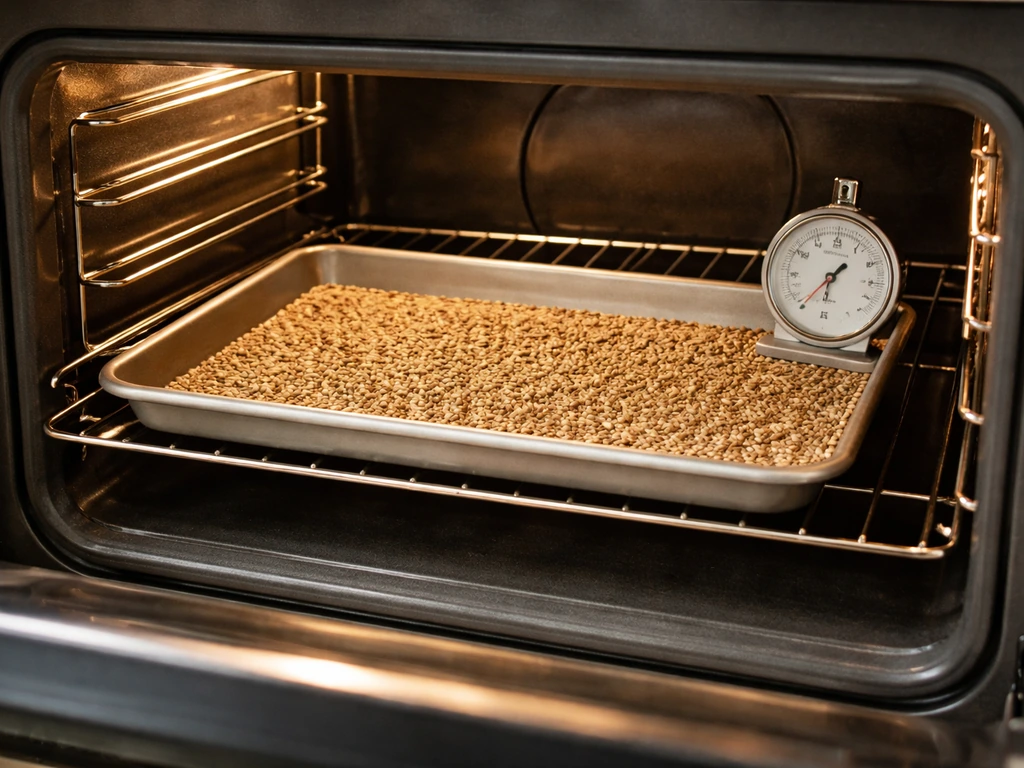
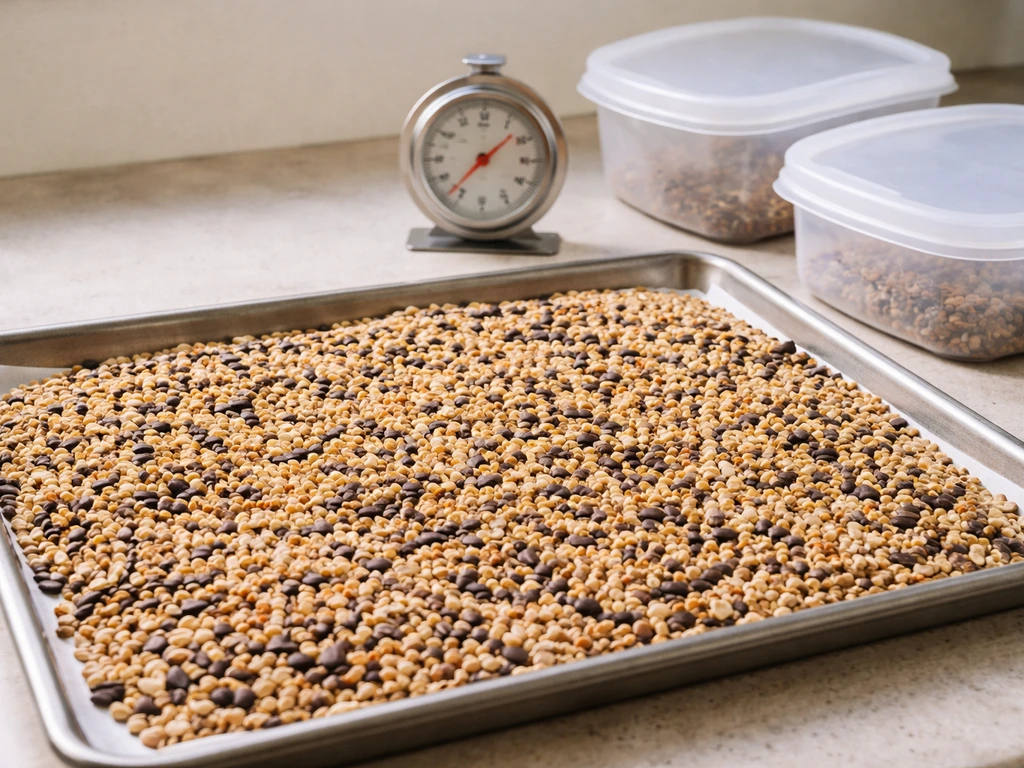
- Preheat your oven to 250°F (121°C). Use an oven thermometer to verify the temperature; home ovens often run 10 to 25 degrees off.
- Spread the cleaned seed in a single layer, no more than about half an inch deep, on a rimmed baking sheet. Overcrowding traps moisture and creates uneven heating.
- Place the sheet on the center rack and bake for 30 minutes.
- Do not increase the temperature to speed things up. Above 300°F you risk scorching oils in the seed and releasing unpleasant fumes indoors.
- Remove the tray and let the seed cool completely on the pan before moving it, at least 45 to 60 minutes.
Step 3 (alternative): Kill bugs only with freezing
- Portion the seed into sealed, airtight freezer bags or containers. Squeeze out excess air before sealing.
- Place in the coldest part of your freezer (verify it reaches 0°F with a thermometer).
- Leave undisturbed for at least 4 days. Some sources suggest 72 hours minimum, but 4 full days gives more confidence that heat penetrates to larvae inside the seed kernels.
- Remove from the freezer and let the sealed bags come to room temperature before opening. This prevents condensation from forming directly on the seed, which would introduce moisture.
Drying, storing, and reintroducing seed safely after sterilizing
This step is where most people run into trouble. Freshly oven-baked seed releases steam as it cools, and if you seal it while it's still warm or before it's fully dry, you'll trap that moisture and create perfect conditions for mold to return within days.
Drying after oven treatment
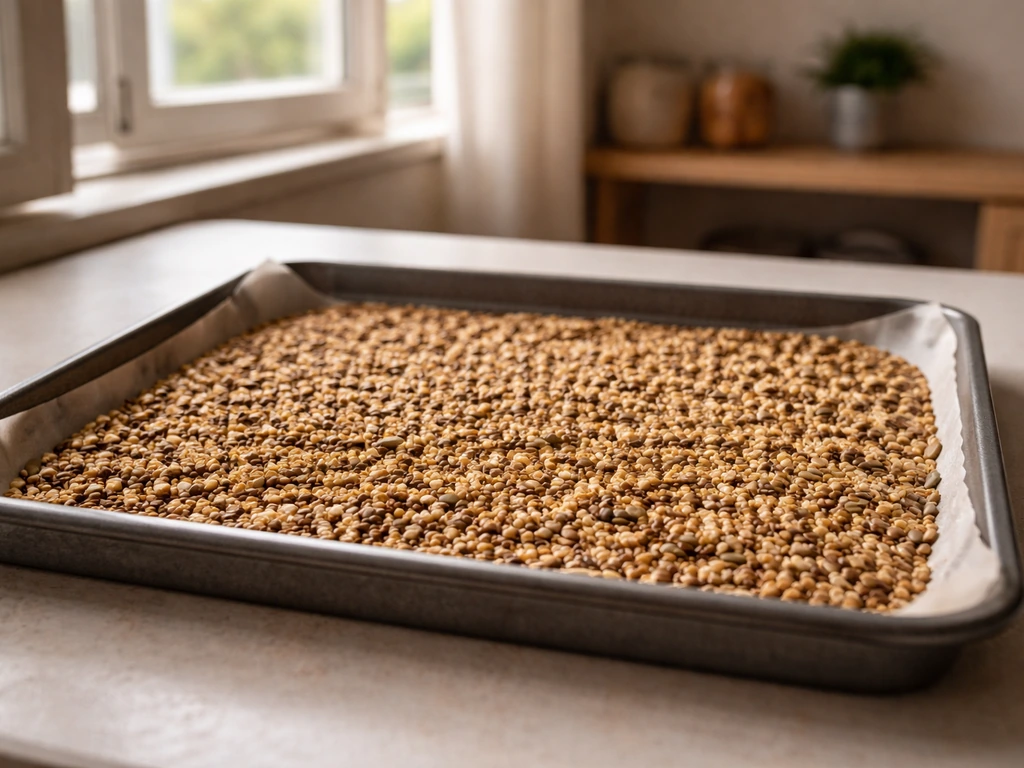
After the seed comes out of the oven, spread it on the tray in a dry, well-ventilated room and let it cool for at least an hour. In humid climates (anything above 60 percent relative humidity consistently), give it two hours or run a small fan nearby. The seed should feel completely dry and room temperature to the touch before you transfer it to storage. If it feels even slightly warm or tacky, wait longer.
Drying after freeze treatment
Leave the sealed bags or containers closed until they fully reach room temperature. Open them in a dry area, not a humid kitchen or garage. Spread the seed on a tray and let it air out for 20 to 30 minutes before storing or filling feeders.
Storage after sterilizing
Store sterilized seed in a hard-sided, airtight container: a metal garbage can with a locking lid, a food-grade plastic bin with a gasket seal, or glass jars for smaller quantities. Avoid cloth bags, paper bags, or loose lids. Keep the container in a cool, dry location, ideally below 70°F and away from direct sunlight. In general, you can store bird seed in the fridge to help slow mold and bacteria growth, as long as it is fully dry first. Penn State Extension recommends a cool, dry storage location specifically to slow mold and bacterial growth between uses. If you live somewhere humid, consider adding a small silica gel desiccant packet inside the sealed container.
Reintroducing seed to feeders
Only fill feeders with as much seed as birds can eat in roughly one day. Penn State Extension makes this recommendation explicitly: excess seed sitting in a feeder is the fastest path back to mold and contamination. In wet weather, reduce fill amounts even further. If you're in a rainy period, consider switching to a covered tube feeder or taking the feeder down temporarily rather than fighting constant mold cycles.
Troubleshooting: when seed still smells, clumps, molds, or won't germinate
- Seed clumps after oven treatment: It wasn't fully dry before storage. Spread it out again, let it air dry for another hour, and re-store in a drier container. Add a desiccant packet.
- Persistent musty smell after sterilizing: The mold contamination was too deep. A surface heat treatment won't eliminate mycotoxins already embedded in heavily damaged grain. Discard and start with fresh seed.
- Mold returns within days of refilling the feeder: The feeder itself is the problem, not the seed. See the feeder cleaning section below.
- Insects keep appearing after freezing: Your freezer may not be reaching 0°F (test with a thermometer), or the freeze duration wasn't long enough. Repeat the treatment for a full 4 to 5 days and verify temperature.
- Seed won't germinate or sprout after oven treatment: This is expected and not a problem for feeding wild birds. Oven heat destroys seed viability. If you specifically need seed that can still sprout (for example for certain ground feeders or planting purposes), use the freeze method instead.
- Seed looks fine but birds won't eat it after oven treatment: Let it cool and air out completely. Seed that is still slightly warm or that has been stored in a container retaining heat can smell off to birds. Fresh air for an additional 30 minutes usually solves this.
Clean the feeder, tray, and ground underneath, not just the seed
Sterilizing the seed but putting it back into a contaminated feeder accomplishes very little. The feeder, the tray underneath it, and the ground below are all part of the same contamination cycle.
Feeder cleaning
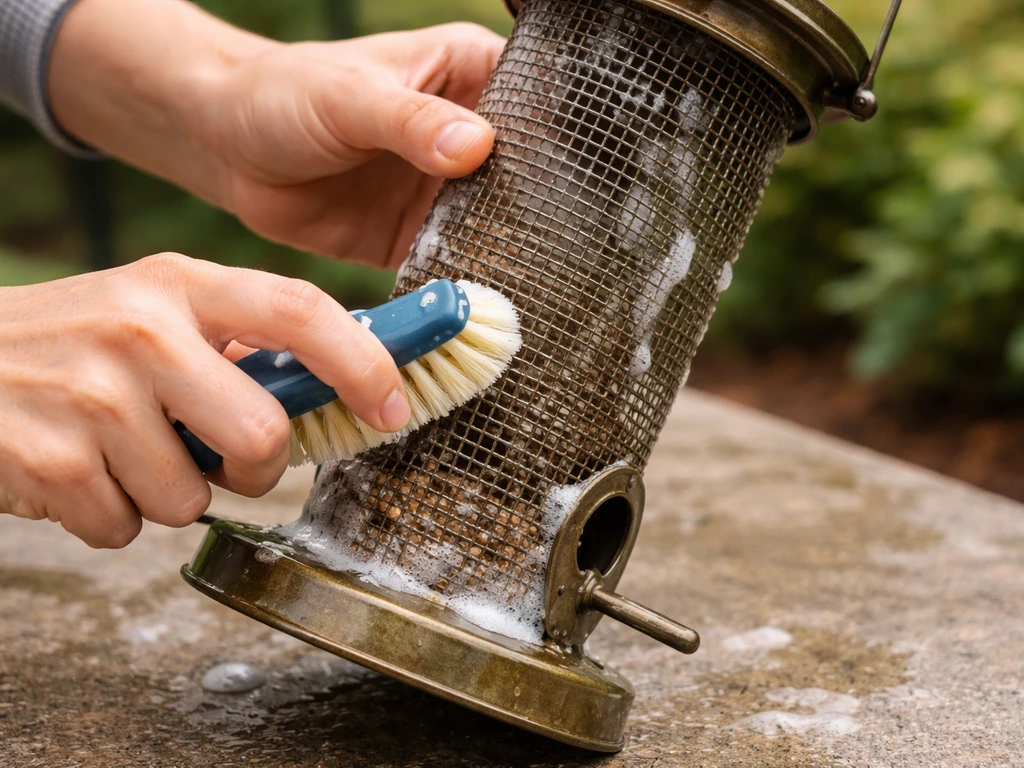
- Empty the feeder completely and discard any old or wet seed.
- Scrub all surfaces with hot soapy water, paying attention to crevices and mesh areas where old seed compacts.
- Soak or thoroughly wipe down all surfaces with a 9: 1 water-to-bleach solution (nine parts water, one part bleach). The CDC, Washington DFW, Mississippi State Extension, and Minnesota DNR all recommend this concentration. Let the solution sit for at least 10 minutes of contact time.
- Rinse thoroughly with clean water. No bleach residue should remain.
- Let the feeder air dry completely before refilling. Iowa DNR specifically flags this step: a damp feeder re-introduces the moisture problem immediately.
Do this monthly as routine maintenance, and after any visible mold, disease outbreak among your feeder birds, or heavy rain period. Minnesota DNR links unclean feeders and moldy seed directly to bird illness, and the fix is straightforward.
Tray and ground cleanup
The area under your feeder is often the most contaminated spot in your whole setup. Droppings, wet seed, and sprouting husks accumulate there and become a reservoir for Salmonella and Aspergillus. BC's wildlife health guidance specifically recommends raking and removing droppings and old moldy seed from under feeders. K-State Extension adds that spilled seed cleanup is a key part of feeder hygiene. Rake or scoop debris weekly, especially after rain. You can also lay a large tray or hardware cloth beneath the feeder to make cleanup easier.
If you've had a confirmed disease event among your feeder birds, disinfect the ground area under the feeder with the same bleach solution used on the feeder, let it dry, and consider moving the feeder to a new location temporarily to break the transmission cycle. A Reddit thread in r/birding also cited a 10% bleach solution recommendation from an Iowa State Wildlife Veterinarian for disinfecting bird feeders Reminder... Disinfect feeders with a 10% bleach solution.
Species and climate tips: adjusting your approach for who's eating and where you live
Hot, humid climates (Southeast, Gulf Coast, Mid-Atlantic summers)
Seed in these conditions can go moldy within 24 to 48 hours during summer if feeders aren't designed for airflow. Use mesh or tube feeders that allow rain to pass through rather than accumulate, fill feeders daily with small amounts, and prioritize freezing (not oven treatment) during the hottest months to avoid heating already-warm storage areas. Prioritizing freezing during the hottest months helps reduce bug and contamination risk without heating the seed prioritize freezing. Ground-feeding birds like doves, towhees, and sparrows are most at risk from contaminated spilled seed, so daily cleanup under feeders matters more here than anywhere else.
Cold, dry climates (Northern Rockies, Upper Midwest, Canada)
Freezing is a natural advantage here. If outdoor temperatures stay reliably below 0°F, you can use an unheated garage or shed as a natural freezer for treating seed bags. Mold is less of a rapid threat in dry cold air, but seed stored in a warm indoor location can still attract pantry moths brought in on the bag. Freeze any new bags before bringing them into the house. Chickadees, nuthatches, and woodpeckers (common cold-climate feeder visitors) are particularly susceptible to Aspergillus, so moldy suet and seed should be removed promptly.
Pacific Northwest (wet winters and springs)
Persistent rain is the main enemy here. Even a well-maintained feeder can accumulate moisture during multi-day rain events. Consider taking feeders inside during heavy rain periods and offering seed in covered hopper feeders. Finches and siskins (very common in the PNW) congregate in large numbers, which accelerates the spread of Salmonella at feeders. The Washington DFW explicitly connects feeder hygiene to Salmonella outbreaks in wild finches. Clean feeders every two weeks minimum during wet months.
Birds that eat directly from the ground
Mourning doves, dark-eyed juncos, white-throated sparrows, and California quail are all ground feeders. They pick up seed and droppings simultaneously, making them the most vulnerable group to Salmonella and moldy seed. If you feed ground birds, scatter only small amounts of seed they'll finish within hours, and rake the area daily. Oven-sterilized seed is the better choice for these birds since you want the lowest possible mold and pathogen load at ground level.
Sterilizing seed is one part of a larger hygiene routine. Keeping seed fresh longer through good storage habits, stopping sprouting before it starts, and knowing how long different seed types stay viable are all connected pieces of the same puzzle. If you use the sterilization steps above and then store seed properly, you can make bird seed last longer and stay safer for feeder birds. Good storage and feeder habits also help you keep bird seed from sprouting once the moisture cycle starts. Getting the sterilization step right makes everything downstream easier.
FAQ
Can I sterilize bird seed that already got wet or clumped, or should I throw it out?
If it is visibly moldy, musty, or clumped, discard it first. Heat and freezing reduce living pests and many pathogens, but they cannot reliably remove mold damage or mycotoxins already produced in the grain. If it is only slightly damp with no visible mold and no off smell, drying it completely before sterilizing may help, then sterilize and store in airtight, dry containers.
Do I need to sterilize every time I open a new bag of seed?
Not necessarily. Most new, packaged seed is fine as-is. Sterilize when the bag sat unsealed or in a humid area, after it has been exposed to moisture, or if you notice signs of pests, sour or musty odor, webbing, or larvae. Treat the “risk event” rather than every bag by default.
What if I do not have an oven with temperature control, can I still sterilize seed safely?
Use an oven thermometer. If you cannot verify 250°F (121°C) consistently, you may under-treat (bugs and mold survive) or over-treat (seed scorches or releases odor). If you cannot confirm temperature accuracy, freezing is the safer alternative because it does not rely on precise oven heat.
Is it okay to sterilize seed in bulk and then store it immediately?
No, it must fully cool and dry first. Steam during cooling can condense inside containers, restarting mold. Let it cool in a dry, ventilated room until room temperature, then open to air out briefly (20 to 30 minutes) before sealing airtight.
Can I combine methods, like freeze first and then oven-sterilize?
You usually do not need to. Combining may be useful only if you are dealing with both heavy pest activity and surface contamination, but freezing first will not remove mold that has already started. If you do combine, make sure the seed is completely dry before oven treatment to avoid creating added moisture.
Should I sterilize seed trays and feeders at the same time as the seed?
Yes, otherwise you re-contaminate the seed. The feeder, the tray, and the ground under it form the same contamination cycle. Wash equipment with hot soapy water, and if there were moldy or infested materials, soak items in the bleach dilution used for cleaning, then rinse thoroughly and dry completely.
How can I tell if the seed is dry enough after baking for safe storage?
It should be room temperature and non-tacky to the touch, with no visible condensation when you put it in a clear container briefly. If it feels warm, sticky, or slightly tacky, wait longer and keep it in a ventilated dry area before sealing.
Is refrigeration for sterilized seed the same as freezing to kill pests?
No. Fridge temperatures help slow mold and bacteria, but they typically do not reliably kill weevil eggs or all pest life stages. Use freezing (0°F for at least four days) for pest control, and only refrigerate if the seed is fully dry and you are mainly trying to slow regrowth.
What container should I avoid, and why?
Avoid cloth or paper bags and any loose-lidded containers. They allow moisture and humidity exchange, which lets mold rebound even after sterilization. Choose an airtight, hard-sided container with a gasket seal, and keep it cool and out of direct sunlight.
How often should I clean the area under the feeder if I am sterilizing seed monthly?
More often during wet weather, ideally after rain events, and at least weekly for cleanup. Even perfectly sterilized seed can become contaminated from droppings, wet spilled seed, and sprouting husks on the ground, which act as a reservoir for Salmonella and Aspergillus.
Does sterilization prevent seed from sprouting?
It reduces pathogens and pest stages, but sprouting depends mostly on moisture and warmth. Sterilize only solves part of the problem, so prevention relies on keeping seed fully dry, using small feed amounts, and cleaning up spills quickly to stop the moisture cycle.
Can I sterilize seed for ground-feeding birds, like doves, instead of using daily small amounts?
Sterilized seed still needs rapid cleanup to break the contamination cycle. Ground-feeding birds pick up seed and droppings together, so the safest approach is sterilize the seed and also scatter only small amounts they finish within a few hours, then rake or scoop daily.
What signs mean the seed is unsafe even if I already sterilized it?
If, after sterilization and storage, the seed develops a musty smell, clumps, visible mold, or fresh pest activity (webbing, larvae), do not feed it. Discard it, clean the storage container and feeder area, and re-evaluate where moisture is entering the system.