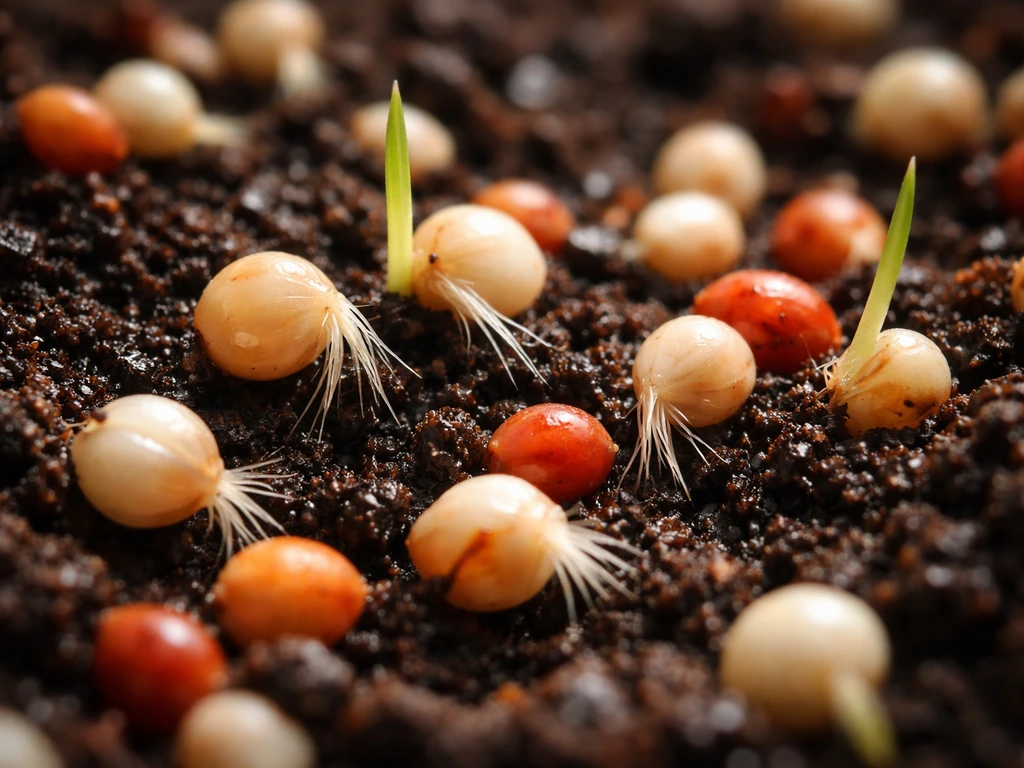
Bird seed that's starting to germinate looks swollen and slightly soft compared to dry seed, with a tiny white or cream-colored root tip (the radicle) poking out of the seed coat. This general sequence starts with water uptake that causes the seed to imbibe and swell, followed by emergence of the embryonic primary root (radicle) and later the shoot.
What Bird Seed Looks Like When It Grows (Germinates)

Maya Collins
17 May 2026
A day or two later you'll see a pale green or yellowish shoot pushing up. That's healthy germination. What you don't want to confuse it with is spoilage: gray, green, black, or white fuzzy patches, a slimy texture, or a musty or sour smell. Sprouts and mold can appear within a day of each other in warm, wet conditions, so knowing the difference matters a lot for your birds.
What germination actually looks like, stage by stage
Before any visible change, the seed is absorbing water in a process called imbibition. Yes, you can get sprouts from bird seed as long as the seeds are viable and conditions are moist and warm enough for germination imbibition. The seed swells noticeably, the outer coat softens, and if you press a sunflower seed between your fingers it gives slightly instead of being rock-hard. This can happen within hours of the seed getting wet. Corn, for example, needs to absorb roughly 30% of its own weight in water before germination even begins.
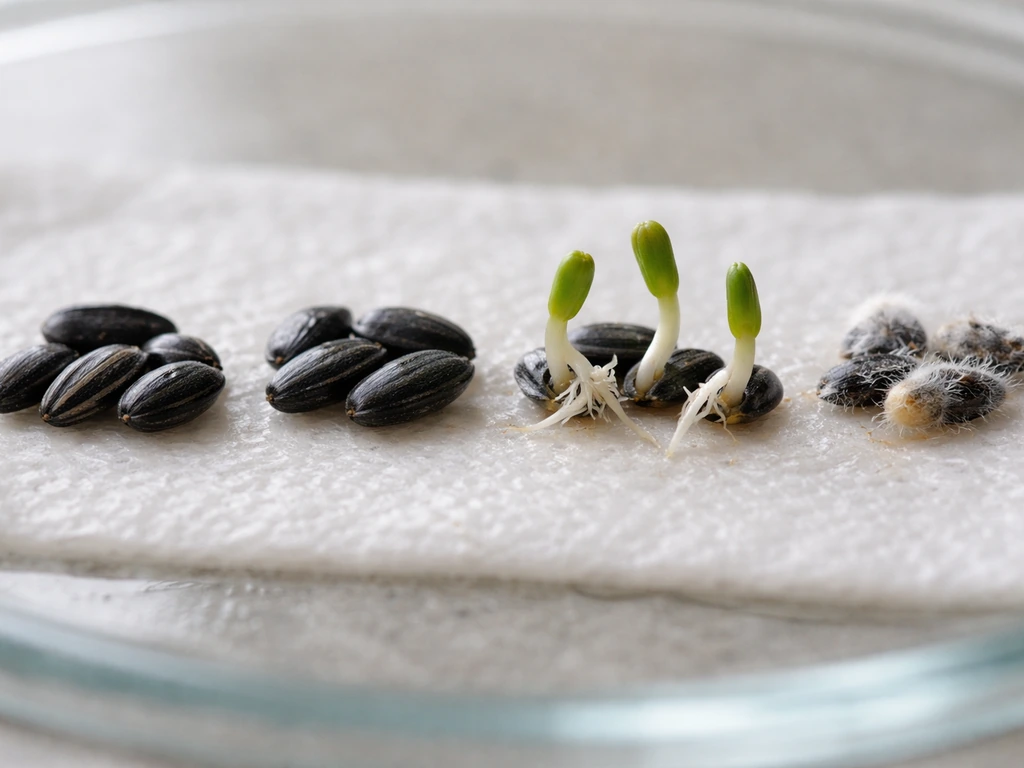
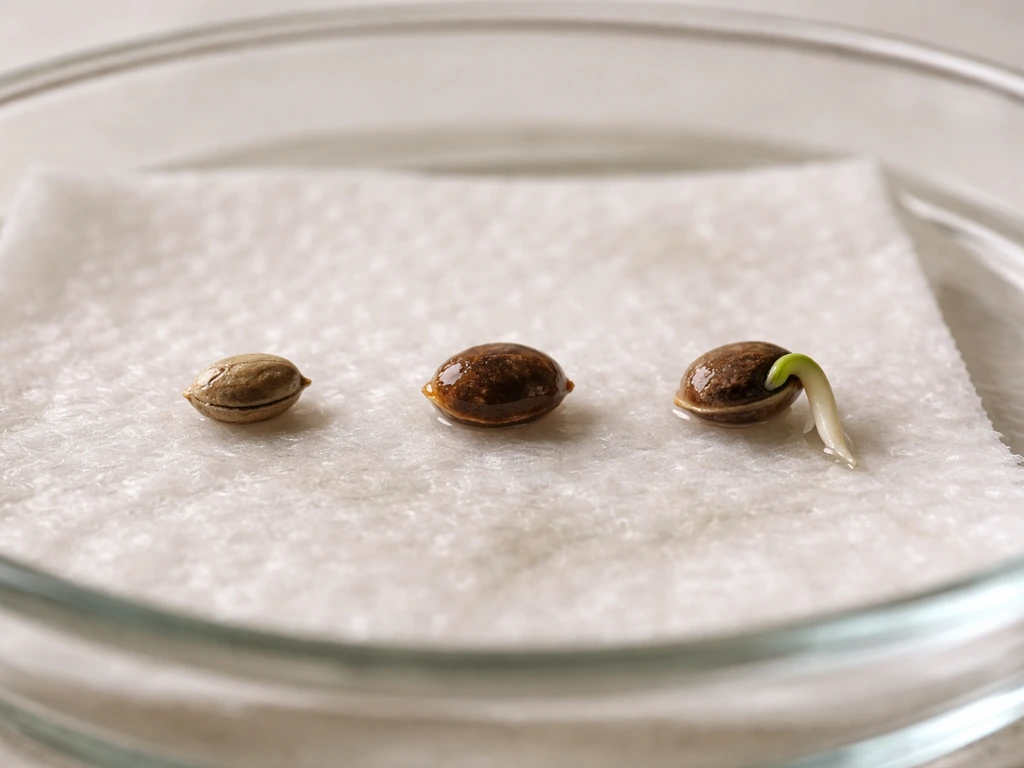
The first thing you'll actually see is the radicle, the embryonic root. It emerges as a small white or pale-yellow tail from one end of the seed, usually 2 to 5 millimeters long at first. Scientists use radicle emergence as the standard measure of successful germination because it's the clearest early sign. At this stage the seed is technically alive and growing, but it still looks mostly like a seed with a little nub attached.
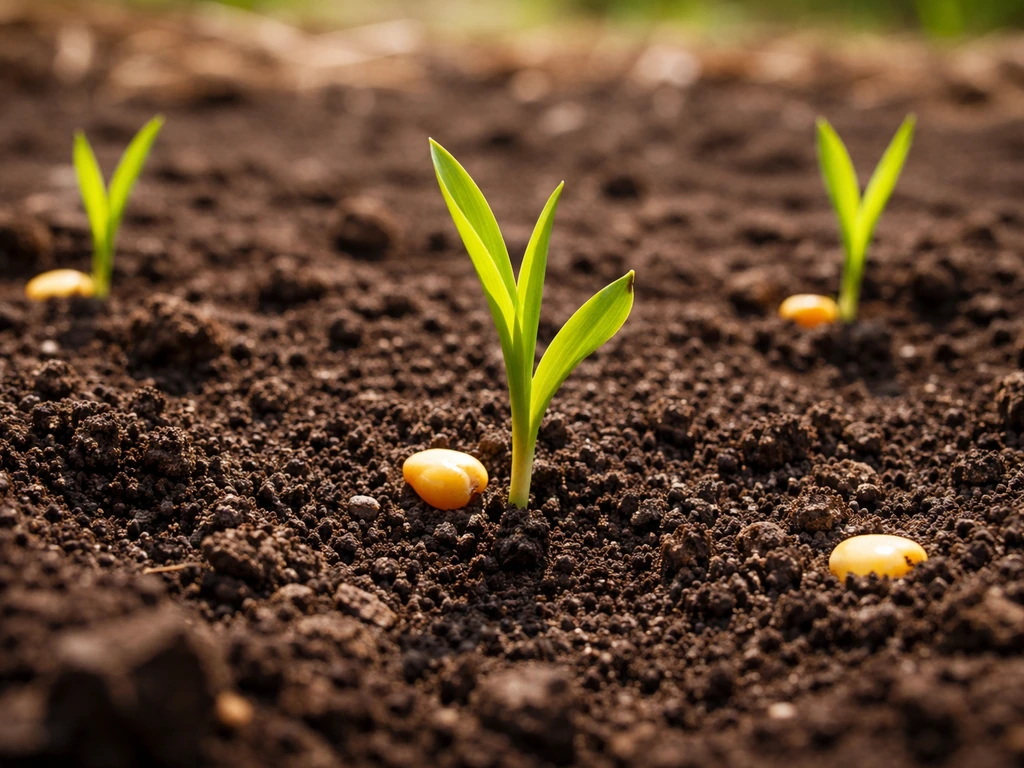
After the root tip comes the shoot, called the plumule. It pushes upward through the seed coat (or from between the seed halves in dicots) as a pale green or yellowish curved hook. Over the next few days, especially with warmth and continued moisture, this shoot straightens out and the first true leaves unfurl. At that point you have a recognizable seedling, not just a sprouting seed.
- Stage 1 (hours): Seed swells and softens from water uptake. No visible root yet.
- Stage 2 (1–3 days): White or cream-colored root tip (radicle) emerges from one end of the seed.
- Stage 3 (2–5 days): A pale green shoot (plumule) pushes out, often appearing as a curved hook.
- Stage 4 (5–10 days): Shoot straightens, seed leaves (cotyledons) open, and a small seedling is visible.
How to tell healthy sprouts from mold, rot, and insects
This is where most people run into trouble. A sprouting seed looks clean. The root tip is white or cream, firm, and odorless. The seed itself, even if split open, smells neutral or slightly green and grassy. Spoilage looks and smells completely different, and once you've seen both you won't confuse them.
| Sign | Healthy germination | Spoilage / mold |
|---|---|---|
| Color | White/cream root tip, pale green shoot | Gray, black, green, or white fuzzy patches on seed surface |
| Texture | Firm root, slightly soft seed coat | Slimy, mushy, or sticky seeds; may clump together |
| Smell | Neutral to faintly grassy | Musty, sour, or ammonia-like odor |
| Appearance | Clean split in seed coat, intact seed body | Discolored hulls, visible fuzz or webbing |
| Insects | None | Tiny weevils, moth larvae, or webbing in clumped seed |
The practical rule: if it smells wrong or looks fuzzy, it's spoiled, full stop. Don't try to sort through it or dry it out for later. Mold on bird seed can produce mycotoxins that are dangerous to birds, and the same aspergillus molds that show up in wet feeders can cause serious respiratory disease in birds. Project FeederWatch flags moldy seed and accumulated hulls as a real health risk for feeder birds. Toss the seed, clean the feeder, and start fresh.
Insect infestation looks different from both sprouting and mold. You'll often see webbing binding seeds together, tiny moths or beetle-like weevils moving through the seed, or a fine dust of frass (insect droppings) at the bottom of the container. Infested seed should also be discarded immediately, and the feeder or storage container needs a thorough clean before you refill it.
What each type of bird seed looks like when it sprouts
Different seeds in a typical feeder mix behave differently when they get wet, so knowing what to look for seed-by-seed helps you diagnose what's happening in your feeder or on the ground.
Sunflower seeds (black-oil and striped)
Black-oil sunflower is the most common feeder seed, and it germinates readily. When it sprouts, the black hull splits lengthwise and a pale root tip pokes out from the pointed end. The shoot that follows is thick and white before it greens up in light. Sunflower will germinate at temperatures as low as 39°F, though you need at least 46 to 50°F for consistent germination, which means any prolonged wet spell in spring or fall can trigger sprouting under your feeder. Striped sunflower sprouts the same way but the hull is harder, so germination is a bit slower.
Millet (white and red)
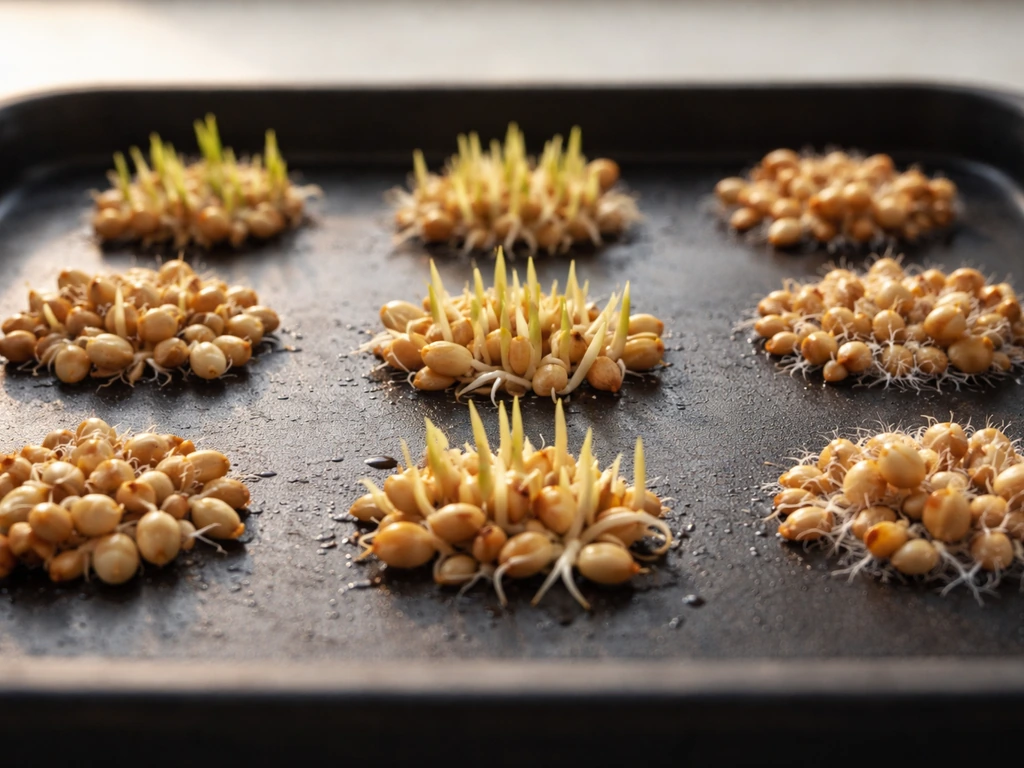
Millet seeds are tiny and round, which makes early sprouting easy to miss. The seed swells and a hair-thin white radicle emerges, followed quickly by a very fine, grass-like shoot. Because millet is so small, a clump of sprouting millet in a feeder tray just looks like a greenish, damp mat. This is one of the seeds most likely to form a carpet of grass-like seedlings under a tube feeder after rain.
Cracked corn
Cracked corn is already broken into pieces, so it can't germinate the way a whole kernel can. Whole corn kernels in a mix are another story: the germ end softens and swells, then pushes out a white root tip and, eventually, a tightly rolled shoot. Corn needs to absorb a significant amount of water before that root emerges, and in cooler conditions you might not see the radicle for one to two weeks after the seed gets wet. Cracked corn that's wet mostly just rots rather than sprouts, turning dark and mushy relatively quickly.
Peanuts (in shell and shelled)
Peanuts in feeders are almost always roasted, which kills the embryo and means they can't germinate. Raw peanuts that get wet will swell inside the shell and, if conditions are right, push out a thick pale root from the tip of the shell. Shelled raw peanuts sprout similarly: the skin splits and a stubby root emerges. More commonly, though, peanuts that get wet in feeders just go rancid and grow mold rather than sprout, so a strong sour or off smell from your peanut feeder is a reliable warning sign.
Nyjer (thistle) seed
Nyjer seed sold for feeders in the US is required to be heat-sterilized before import, which means it's not supposed to be viable for germination at all. To understand whether your nyjer is actually nyjer and why it tends to clump, learn what nyjer bird seed is and how it behaves when it gets wet what is nyjer bird seed. If you see sprouting from what you believe is nyjer, it's likely a contaminant seed in the mix.
What nyjer seed does when it gets wet is clump and go rancid fast, since its high oil content makes it spoil quickly. If your nyjer feeder smells off or the seed feels sticky or clumped, it's time to clean out and reload.
Why seed sprouts (or rots) in feeders and on patios
Three things drive sprouting and spoilage: moisture, warmth, and time. A feeder with no drainage lets rain or morning dew pool in the seed tray. Within 24 to 48 hours in warm weather, viable seeds begin germinating and spoilage organisms start growing too. If you want to grow bird seed on purpose, start with a seed type that germinates well and follow the same moisture and drainage basics that prevent mold.
On the ground under a feeder, fallen seed stays moist longer because it's shaded, pressed against soil, and not draining. In climates with heavy spring rain or high humidity (much of the US east of the Rockies, the Pacific Northwest, and the Gulf Coast), this is a recurring problem, not a one-time event.
Improper storage is the other big driver. Seed stored in a bag left open, a metal can with a loose lid, or anywhere it can pick up humidity will begin absorbing moisture from the air long before it gets obviously wet. That moisture alone is enough to lower germination time and create conditions for mold. The Minnesota DNR specifically recommends keeping feed dry and scraping out old seed regularly to prevent mold and bacteria from forming.
What to do right now: remove, clean, or discard
If you're looking at wet, sprouting, or suspicious seed today, here's the practical sequence to follow.
- Put on disposable gloves before handling wet or moldy seed. Mold spores are an irritant and some people are sensitive to them.
- Remove all seed from the feeder or tray. Don't try to sort through it or save part of the batch.
- If seed smells off, looks fuzzy or slimy, or has visible discoloration (gray, black, white, or green patches), bag it and put it in the trash. Do not compost moldy seed.
- If seed looks and smells clean but is simply wet (just rained, no mold yet), you can spread it on a clean dry surface in direct sunlight to dry. Spread it thinly so it dries fast. Only do this if you can confidently confirm there's no mold.
- Clean the feeder with a 9-to-1 water-to-bleach solution (9 parts water, 1 part household bleach). Soak removable parts for a few minutes, scrub with a brush, rinse thoroughly, and let the feeder dry completely before refilling.
- Never mix bleach with ammonia-based cleaners. The fumes are toxic.
- Wash your hands well with soap and water after handling seed, feeders, or cleaning materials, even if you wore gloves.
Seed on the ground is a separate concern. Wet seed sitting on soil or pavement under feeders can develop mold within a day in warm weather, and birds that forage on the ground (like doves, juncos, sparrows, and towhees) will eat it directly. Rake or sweep up wet or sprouted ground seed and discard it. If seedlings are already growing, pull them before they establish.
How to prevent sprouting and mold going forward
Feeder design and placement
Choose feeders with built-in drainage holes in the tray or bottom, or add them yourself with a small drill bit if the feeder has a solid-bottom tray. A weather baffle or roof over the feeder dramatically reduces how much rain lands directly in the seed. Tube feeders with small ports and no tray accumulate less standing water than open platform feeders, which is worth considering if you're in a wet climate.
Fill amounts and refill frequency
Only fill feeders with as much seed as birds will eat in two to three days. This is the single most effective habit change you can make. Seed that moves through the feeder quickly never sits long enough to absorb moisture and germinate. During wet stretches, drop to a one-day supply if needed.
Seed storage
Store seed in a sealed, airtight container, metal or hard plastic, in a cool dry location. A sealed galvanized metal trash can kept in a garage or shed works well for larger quantities. Avoid storing seed in fabric bags or open cardboard boxes, both of which let humidity in. Don't store seed directly on a concrete floor, which can transfer moisture through condensation. Properly stored seed in cool, dry conditions will stay fresh for up to a year for most seed types.
Regular feeder cleaning
Clean your feeders at least once a month in dry weather and every one to two weeks during humid or rainy periods. A quick scrub with dish soap and hot water handles routine cleaning. Use the dilute bleach solution (9 parts water, 1 part bleach) for deeper disinfection or after a mold event. Use CDC’s bleach-cleanup ratio example of 1 cup household bleach per 1 gallon of water for visible mold cleanup scenarios Use the dilute bleach solution (9 parts water, 1 part bleach). Always let the feeder dry completely before refilling, since even a slightly damp feeder will accelerate seed clumping.
How sprouted and wet seed changes backyard wildlife behavior
Birds often notice the difference between fresh and degraded seed before we do. Many species, particularly finches and chickadees, will abandon a feeder where the seed has gone musty or clumped, returning only after you've cleaned it out and refilled it. That sudden drop in feeder activity after a rain is a useful signal: check the seed, not the birds.
Ground-feeding species are more vulnerable to spoiled seed exposure because they forage where wet seed collects. Mourning doves, white-throated sparrows, dark-eyed juncos, and towhees all eat fallen seed directly from the ground and will consume sprouted or beginning-to-mold seed without obvious hesitation. This makes regular ground cleanup under feeders important, not optional.
Squirrels will dig into sprouting seed around feeders and on the ground, and they're generally less selective than birds about freshness. However, wet seed that's sitting on the ground also attracts rodents, including mice and rats, especially if it's accumulating in quantity. Project FeederWatch recommends stopping feeding for a couple of weeks if you notice a rodent problem, then resuming with feeders that minimize ground spillage.
One myth worth busting: sprouted seed is not automatically safer or more nutritious for birds just because it's "natural." A sprout is only safe if it's clean, fresh, and uncontaminated. Sprouted seed sitting in a wet feeder or on damp ground for more than 24 to 48 hours in warm conditions is almost certainly also hosting mold or bacteria, even if it's still green and looks healthy. The risk to birds is real: K-State Extension links contaminated feeders to serious avian respiratory disease. Don't assume green means good.
If you're curious about which seeds actually grow into plants and what those plants look like at a more advanced stage, that's a related question worth exploring separately, including topics like what grows from bird seed in general, whether you can intentionally grow bird seed as a garden planting, and whether nyjer seed specifically can grow. The short version for today's problem: treat any germinating seed in your feeder or on your patio as a maintenance issue, not a gardening opportunity. If you are growing bird seed indoors, make sure you use clean containers and keep moisture and airflow balanced so you get sprouts instead of mold germinating seed indoors.
FAQ
If my bird seed is already sprouting, can I just dry it out and reuse it later?
No. Even if it still looks green, sprouted seed can already be hosting mold or bacteria after 24 to 48 hours in warm, wet conditions. Drying it out afterward does not reliably remove contaminants. The safer move is to discard the affected seed and clean the feeder and any surrounding tray or ground area thoroughly.
How can I tell if I’m seeing viable sprouts versus mold that happens to look pale or fuzzy?
Look for texture and smell together. Viable sprouting usually has a firm white or cream radicle and an odor that’s neutral or slightly grassy. Mold is more likely to be fuzzy in spots, slimy overall, and accompanied by a sour, musty, or otherwise off smell. If you see fuzzy patches of any color or detect a wrong odor, treat it as spoiled.
Do birds get sick if they peck a little sprouted or moldy seed before I notice?
They can, especially with respiratory risk from certain molds, but it’s still not a reason to wait and “see what happens.” Remove the seed, clean the feeder, and stop using that mix until it’s fully replaced. If you notice coughing, labored breathing, or lethargy, contact a local wildlife rehabilitator or avian vet for guidance.
What should I do when sprouting happens in heavy rain, and the feeder stays wet overnight?
Treat it as a sanitation event. Empty the tray, discard any wet or beginning-to-mold seed, and scrub the feeder. Let everything dry completely before refilling. If rain is frequent where you live, use a feeder style that reduces standing water (drain holes, deeper roof coverage, smaller seed ports) and switch to a shorter fill duration.
Why do I get clumps in some seed mixes even when I don’t see obvious mold?
Clumping usually means moisture is getting trapped long enough for seeds to hydrate and stick to each other. This is common with oil-rich or fast-spoiling mixes, and it can also happen in humid conditions even if you don’t see fuzzy growth yet. Clean out clumps promptly, check for drainage, and consider using smaller, more frequently refreshed amounts during wet spells.
Does the seed need to be warm for sprouting, or can it sprout in cooler weather too?
It can sprout in cool conditions if it stays moist long enough, but it will generally be slower and more sporadic. Many feeder seeds are more consistent once temperatures are in the reliable germination range, so short warm spells followed by cool wet nights can still trigger radicle emergence. If your area has cool, wet weather, assume “moist plus time” can still create both sprouts and spoilage.
If I want to test viability, how can I do it without risking my birds?
Do the test away from your feeders. Use a small, clean container with controlled moisture and good airflow, then inspect radicle and shoot development. Do not return the tested seed to the bird feeder if it fails or if it develops any suspicious fuzz, slime, or odor.
Can I use sprouted seed as compost or discard it safely without attracting pests?
Yes, but manage it like spoiled seed. Bag or contained disposal is usually best to avoid attracting rodents. If composting, mix into a larger volume and avoid leaving wet clumps sitting around. For heavy mold or a strong off smell, sealed disposal is safer than open composting.
How often should I clean if my feeder gets sprouting regularly after storms?
In that situation, clean sooner than “once a month.” After any wet event that leaves standing seed, remove seed immediately, scrub the feeder, and dry it fully before refilling. During recurring humid/rainy weeks, increase cleaning frequency to every one to two weeks or whenever you see clumping, damp hulls, or residue in the tray.
Why do some seeds in the mix sprout while others just rot, even if they’re all wet?
Different seeds have different requirements for moisture uptake and timing. Some sprout quickly when conditions are right, while others tend to rot faster if they cannot germinate in time or if they’re already less viable. Cracked or damaged kernels are especially likely to rot rather than develop a clear radicle and shoot. That’s why a mix can look like “some are fine” while other portions are actually spoiled.
Next Article
Can Corn Grow From Bird Seed? How to Test and Plant
Learn if bird seed kernels can sprout into corn, how to germination-test, plant, and safely avoid mold or additives.